When you link your Lorex camera to your home network or DVR systems, you get to keep an eye on your home’s security and get motion detection alerts instantly. But, to make this work, you need to set up the camera properly using the Lorex Home app. Like any tech gadget, sometimes your Lorex camera might act up and have trouble connecting.
Usually, these connection problems happen because of issues with your network settings or the camera itself. Once you figure out what’s wrong and fix it, your camera should link up with your network smoothly.
Why Is My Lorex Camera Not Connecting To WiFi?
It seems like your Lorex camera might be having trouble connecting, and there could be a few reasons for this. First off, make sure you’re using a compatible network – Lorex cameras work best with a 2.4 GHz Wi-Fi network, not a 5 GHz one. Also, double-check that your camera is getting enough power and is properly set up.
If you’re adding a camera to your current DVR or NVR security framework, ensure the similarity between the camera and your system is urgent.
Lorex offers different camera options, so the setup process can vary depending on the specific model you have. However, some common issues might prevent a successful connection:
- Weak Wi-Fi signal: If your signal isn’t strong enough, the camera might not be able to connect properly.
- Compatibility issues with your Lorex Fusion NVR system: Make sure the camera is compatible with your system.
- Running a VPN or Ad-guard on your mobile device: These can interfere with the camera’s ability to connect.
- Router settings: Check settings like MAC address filtering, Firewall, or Port blocking, as they might be blocking the camera’s connection.
- Camera not in pairing mode: If the indicator isn’t flashing rapidly, the camera might not be ready to connect.
To connect your Lorex camera, use the Lorex Home app or add it as a unit to your fusion NVR system. Once connected, you can access the camera through the app or system. Ensure that you carefully adhere to the provided setup instructions.
Lorex Camera Not Connecting To WiFi Fix Issues
To connect your camera, start by connecting the base station if you have wire-free cameras. Then, ensure your camera is powered using a proper outlet or PoE if applicable. For battery-powered models, fully charge the battery before installation. Make sure your Lorex Home app is up to date by checking for updates. Follow these steps to successfully connect your camera.
Check Your Network Connection
To get your Lorex camera up and running smoothly, you’ll want to consider network compatibility based on your specific camera model. Generally, all models are designed to work seamlessly with a 2.4 GHz network.
Before diving into the camera setup, it’s crucial to inspect your router’s settings. Confirm that it supports both 5 GHz and 2.4 GHz frequencies under a unified SSID for optimal compatibility. If it does, try temporarily turning off the 5 GHz option in the router’s admin portal while connecting the camera, then reactivate it afterward.
If separating the frequencies is an option, or if your Lorex camera supports the 5 GHz band, that’s another avenue to explore.
While tinkering with your router’s settings, make sure to disable MAC address filtering. This feature can impede the router from assigning IP addresses to unfamiliar devices, causing glitches during the camera setup.
Pay attention to the basics like keeping your Wi-Fi network name and password under 31 characters. Avoid special characters in the password, as these may be interpreted differently by the app. Opt for the more universally supported “WPA/WPA2” as your Wi-Fi security encryption, as newer options like WPA3 might pose compatibility issues for some smart home devices.
Lastly, if any changes are made in the router’s admin portal, don’t forget to forget the Wi-Fi network on your mobile device, restart both devices and reconnect to the updated Wi-Fi SSID before attempting to link up the camera. Always test your internet connection before the final reconnect by power cycling your router to refresh and reinitiate the network.
Power Cycle The Camera
Sometimes, a quick fix is all it takes to get your Lorex camera back on track. Power cycling is like giving it a moment to catch its breath and start anew. Simply turn off the camera, unplug it from the power source, wait for a couple of minutes, then plug it back in and power it on again. It’s like hitting the reset button, allowing any hiccups or glitches to fade away.
This simple yet effective technique often works like magic, bringing your camera back to life and restoring its connection to the network.
Move Your Camera Closer To The Router
To get the best signal strength, position the camera near the router when setting it up. Once it’s registered to your account and connected to the cloud servers, you can relocate it to wherever you want.
Make sure the installation spots have a solid network signal to prevent any offline problems.
If needed, think about upgrading to a mesh network setup or adding a Wi-Fi extender to enhance your network coverage.
Turn Off VPN And Ad Blockers
In the intricate web of digital connectivity, sometimes unexpected roadblocks arise. If you’re facing trouble connecting your Lorex camera, consider disabling any Virtual Private Networks (VPNs) or ad blockers temporarily.
These digital guardians, while useful in their own right, can sometimes unintentionally interfere with the camera’s communication with the app.
By bidding farewell to VPNs and ad blockers, even just for a moment, you’re giving your camera a clearer path to establish a solid connection with the network. It’s like removing obstacles from its path, allowing it to navigate smoothly and restore seamless communication.
Reinstall Lorex Camera Home App
To fix the problem with your Lorex camera not connecting properly, it’s a good idea to try reinstalling the Lorex Home app on your smartphone. Sometimes there can be a glitch or bug in the app causing the issue.
Here’s a step-by-step guide to reinstalling the app:
- Open your smartphone’s settings and find the storage section.
- Look for the Lorex Home app in the list of apps stored on your phone.
- Tap on the app, then select “Uninstall” to remove it from your device.
- Next, go to the Google Play Store (for Android) or the App Store (for iOS) on your smartphone.
- Search for “Lorex” and find the official Lorex Home app.
- Once you’ve found it, download and install the app again on your smartphone.
Just make sure your phone has enough storage space available to reinstall the app, as it can be a bit of a hassle if you’re low on space. Hopefully, reinstalling the app will solve the connection issue with your Lorex camera!
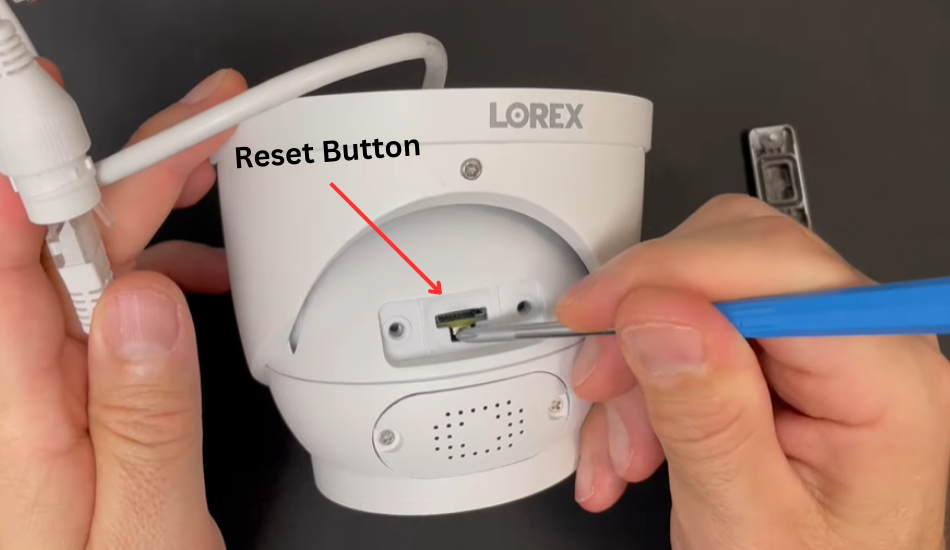
Reset The Lorex Camera
To get your camera back online and running smoothly, it’s a good idea to perform a factory reset. This will clear out any software issues that might be causing problems.
Here’s how to do it for your Lorex camera:
- Take a look at the base and back panel of your camera to find the factory reset button. It’s usually a small button marked with “R” for “reset.”
- Press and hold the reset button for about 30 seconds. You’ll need to wait a bit for the camera to reset completely.
- Once the reset is done check if the issue is resolved and your camera is connected.
If your Lorex camera still isn’t connecting after the reset, try charging it up and reinstalling the Lorex Home app on your mobile device. Also, make sure to troubleshoot your network’s internet connection. If none of that works, go ahead and perform the factory reset again.
Final Thoughts
Once you’ve figured out the reasons behind your Lorex wireless camera not connecting and have tried our suggested solutions to resolve the issue, the final step is in your hands – go ahead and perform the reset as needed.
Should you encounter any uncertainties while applying the solutions, don’t forget that Lorex is just a message or call away for extra help!