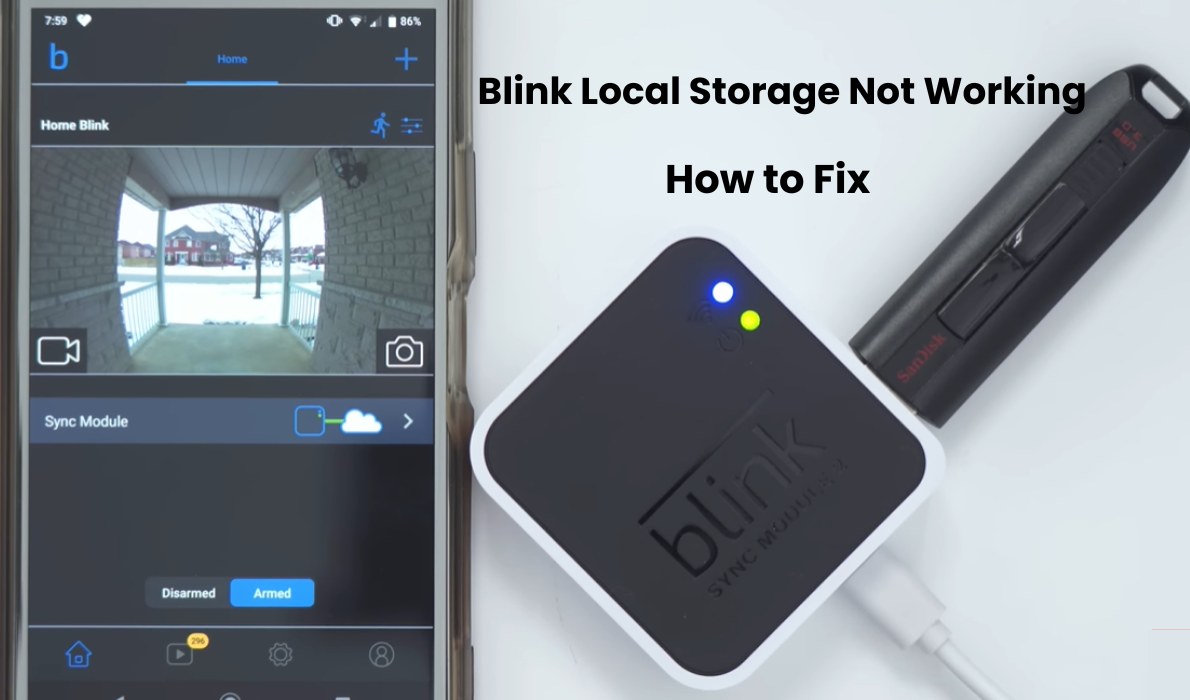
A standout is the Sync Module Two’s local storage feature, which supports USB drives from 1 to 256 GB. This allows easy access to your device recordings without the need for a Blink Cloud subscription. Unfortunately, some users may experience problems with local storage on their Blink system. This issue startlingly restricts usefulness in live view and notices.
Local storage is a key selling point for Blink Cameras and Doorbells, offering the adaptability to save clasps to a blaze drive during web blackouts or membership slips.
Despite its advantages, users sometimes encounter intermittent problems where their Blink device stops recording on USB flash drives and disables them on local storage. To mitigate this it is recommended to maintain cloud and local storage while ensuring uninterrupted coverage of your home activities.
How do I enable Blink Local Storage Not working?
If your local storage is acting up, the usual suspect is the Sync module not recognizing your USB drive. Check if it’s a capacity issue or a corrupted USB. Safely eject, reboot the sync module, and reconnect the USB. Verify the storage status on the Blink app.
Start by inspecting the sync module’s local storage status in the Blink app. Open the app, choose the sync module, tap on Local Storage, and check the status.
If it shows “connected,” it might be an app or sync module glitch. If it’s “full,” clear some space by ejecting the drive.
Remember, clips save when the system is armed with motion detection enabled on the selected camera. Confirm this is the case.
Local storage acts as a backup if you have a cloud plan. Connect the drive to a PC to access recordings.
For Blink Wired Floodlight, Video Doorbell, Indoor (gen 2), Outdoor, and Mini cameras, local storage works without a subscription. Ensure your product supports local storage; some old XT models won’t save through the sync module.
Now, troubleshoot to get the module detecting and saving clips to local storage.
Reinsert the USB flash drive
Let’s kick things off with the simplest fix in our arsenal: unplug the USB flash drive and plug it back into the sync Module.
This method proves to be useful when the sync Module loses its connection with the flash drive, and rehashing this step can assist it in rediscovering the association.
Just a heads up: make sure to safely eject your USB flash drive. This ensures that all your moved information is safely composed onto the USB flash drive, forestalling any deficiency of significant data during the exchange interaction.
Here’s a quick guide on how to safely eject your USB drive:
- Launch The Blink app on your smart mobile or tablet.
- On the Home screen, locate the Sync Module banner and give it a tap.
- Select “Local Storage.”
- Tap the “Safe Eject” blue button.
- Now, patiently wait for the “USB Disconnected” message. Once the USB icon turns ‘inactive,’ you’re good to remove the drive from your Sync Module.
- After that, give it a few minutes, and then re-insert the USB drive into the Sync Module to re-establish the connection.
Power Cycle Your Sync Module
Refreshing the module’s connection to your network and giving its memory a little jog can help fix any startup errors that might be causing issues with the USB detection.
First, make sure to tap on “Safely Eject” within the blink app, under the sync module tab, before power cycling. Once the app disconnects the flash disk, go ahead and pull it out of the module. Now, you’re ready to restart the module.
To power cycle, simply unplug the power adapter to disconnect it. Wait for about 20 to 30 seconds, and then reconnect it to the power source.
Let the sync module go through the initialization process and establish a connection with your network. Once the LED indicator lights are solid blue and green, you can insert the USB drive. Launch the Blink app and verify whether the module successfully identifies it.
Install the Latest Version of the Blink Home App
Ensuring the smooth operation of your Blink security system is crucial, and all components such as the Blink Camera, Doorbell, and Sync Module must be configured within the Blink Home Monitor app. The app plays a pivotal role, and any glitches it encounters could potentially lead to issues, particularly concerning local storage.
To preemptively tackle problems, it’s essential to keep the Blink app up-to-date. Regular updates contribute to its optimal functionality. Set the app to update automatically for added convenience. Here’s a quick guide tailored to both iOS and Android users:
For iOS users:
- Navigate to Settings.
- Select General and tap on Software Update.
- Opt for Automatic Updates and activate it by sliding the button to the right.
For Android users:
- Access the Google Play Store app.
- Open the Menu, and proceed to Settings.
- Choose Auto-update apps and customize your preference: “Over any network” for updates via Wi-Fi or mobile data. “Over Wi-Fi only” for updates exclusively on Wi-Fi.
Additionally, don’t forget to stay on top of Blink device firmware updates. This includes the camera, doorbell, and Sync Module. Keeping everything current ensures a robust and secure home monitoring system. Regularly checking for updates safeguards against potential vulnerabilities, ensuring your Blink system operates seamlessly.
Terminate the Blink app forcefully
If your Blink Home Monitor app is acting up even after an update, and your operating system is turning a blind eye to the issue, you might want to consider forcing a stop. Here’s a quick guide on how to do it for both IOS and Android devices:
For IOS:
- Access the App Switcher by performing an upward swipe from the bottom of your screen.
- Swipe right until you locate the Blink app.
- Swipe up on the Blink app to force stop it. If you’re on iOS 11, tap and hold the app until a red minus symbol appears on the app card, then tap it to quit.
For Android:
- Launch the Settings app on your Android device.
- Scroll down and tap on “Apps,” “Applications,” or “Manage apps.”
- Find the Blink Home Monitor app in the list and select it.
- Tap on “FORCE STOP.”
After following these steps, reopen the Blink app and check if it’s functioning properly.
Reconnect the Sync Module to the app
If you’re grappling with a local storage issue, a nifty fix recommended by Blink involves removing and re-adding the Sync Module in the app. Keep in mind that this method comes straight from the Blink company itself.
One thing to be cautious about employing this troubleshooting tip will wipe out the settings and configurations of your Sync Module from the app.
Here’s a simple guide on how to reintegrate the Sync Module using the Blink app:
- Launch the Blink app.
- Navigate to the Home screen and find your way to the Sync Module settings page.
- Look for the conspicuous red button labeled “Delete Sync Button” and give it a tap.
- After that, hit the “+” button to initiate the process of adding a device.
- Choose the type of device you wish to add, be it a Sync Module or a Sync Module 2.
- Follow the on-screen instructions to wrap up the re-adding process.
This should hopefully address your local storage issue but do remember the trade-off involved in terms of losing your Sync Module’s settings and configurations.
Format The USB Flash Drive On your Mobile
If your USB flash drive’s file system is corrupted, the camera won’t save recorded clips to the thumb drive. To resolve this, it’s advisable to format the USB drive, offering two formatting options: quick and full.
The quick format swiftly deletes the file system table and root folder, freeing up space for other files. Conversely, the full format seeks bad sectors, writing zeros to all sectors, and permanently erasing all data, albeit taking more time.
Here’s a step-by-step guide for formatting your thumb drive on Windows:
- Insert the USB drive into your computer USB port.
- Open File Explorer.
- Click “This PC” in the left pane.
- Navigate to the “Devices and drives” section.
- Choose the flash drive, then select the format option.
- Use the “File system” drop-down menu to pick your preferred option.
- Keep the default selection in the “Allocation unit size” drop-down menu.
- Confirm a drive name under “Volume label” for File Explorer.
- In the “Format options” section, select Quick format or choose based on your use case.
- Click Start, and then confirm with the Yes button.
Factory Reset Your Sync Module
To completely wipe the sync module and start fresh, erasing all connected cameras and app settings, follow these steps:
- Locate the reset button on the side of the sync module, next to the USB port.
- Press and hold the reset button for 5 to 10 seconds, using a thin object.
- Let go of the button when the LED indicator starts blinking in red.
- The reset process begins and takes approximately 15 seconds.
- Once the LED lights are solid green and blinking blue, the sync module is ready to pair with your app.
- Reconnect the sync module and cameras to your home network using the Blink app.
- After connecting, insert the USB drive, arm the system, and test the local storage to ensure it’s functioning properly.
This process not only removes any corrupt files but also downgrades the firmware to the original factory release version. Following these steps will help you set up the sync module and cameras as if they were new.
Contact Support
Should the troubleshooting steps prove insufficient, reaching out to Blink Support is your next move. Visit the official Blink website for contact options, including email and live chat support. The dedicated assistance bunch is excellent in managing particular requests and gives tweaked help, ensuring a speedy objective to your local storage concerns. Don’t hesitate to leverage their expertise for a seamless Blink camera experience.
Final Thoughts
In the journey to resolve “Blink local storage not working,” remember that troubleshooting is a dynamic process. Approach each step systematically, empowering yourself to navigate through potential challenges. Your Blink security system is a crucial piece of your home’s gatekeeper, and ensuring its smooth action is basic.
By following the framed arrangements and remaining proactive with refreshes, you add to a dependable and secure climate. Embrace the propelling thought of advancement, and let your Blink cameras continue safeguarding your home while persevering through efficiency. A careful eye on the arrangements ensures your genuine serenity in the steadily changing scene of smart home security.