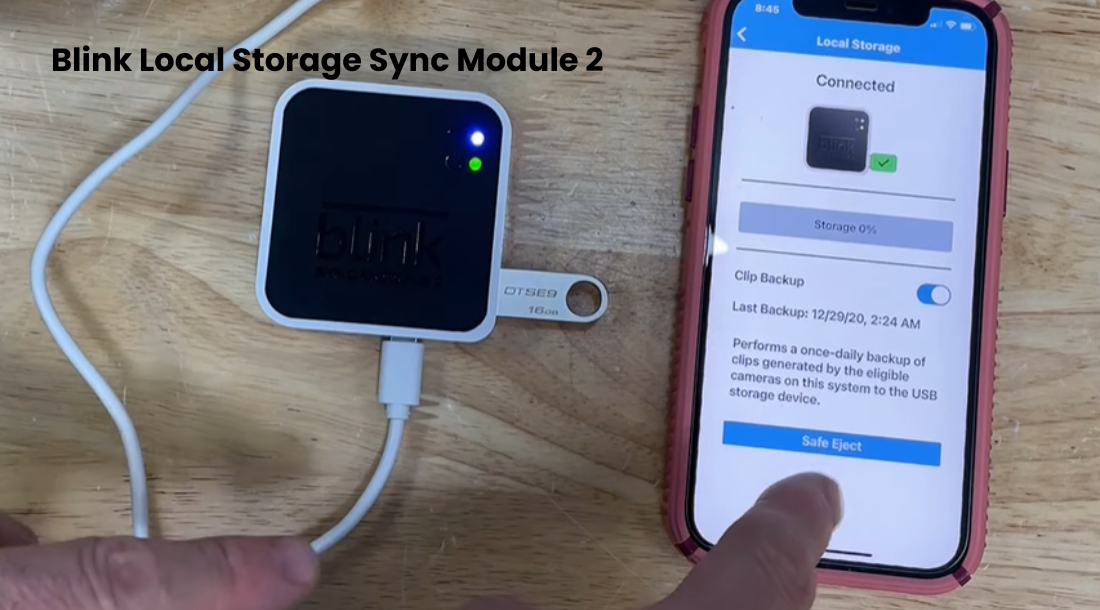
Are you finding yourself frustrated and struggling to run out of space for Blink security cameras and videos in your cloud? Well, say goodbye to that hassle and welcome Blink Local Storage.
With Blink Local Storage you can now save clips from your compatible cameras directly to a USB drive connected to your Sync Module 2. This means you can keep track of all your footage without worrying about exceeding your cloud limits. Additional charges apply for storage or more space.
You can make getting started with local storage a breeze, pop in a USB drive, or work with your Sync Module 2 and use the Blink app to format it. Once you’ve done this, you can start saving clips to a USB drive by selecting Local Storage in the app. You can use your suitable storage from a minimum of 1 GB to a maximum of 256 GB.
Blink Local Storage Without Subscription
If you opt not to subscribe or take advantage of a trial plan, sync module 2 enables local storage for clip recording triggered by motion detection. Once motion detection is activated and your system or camera is armed, clips populate upon triggering, accessible through the Blink app.
It’s important to note that older Blink devices (Indoor (1st Gen), XT, and XT2) do not support local storage. However, newer devices released post-2022 (Mini, Indoor, Outdoor (3rd Gen), Video Doorbell, and Wired Floodlight Camera) do support local storage recording, allowing you to implement this feature.
To ensure complete clip recordings, disable the “Early notification feature” in camera settings. This prevents the clip recording from ending abruptly with motion notifications.
While a subscription isn’t mandatory, the system offers several features without one, depending on your needs:
- Live streaming via the app
- Notifications for motion detection
- Two-way audio factor
- Storing recordings on a USB drive connected locally
Recordings can be accessed from the Blink app’s clips section for playback. You can connect up to 10 cameras to your sync module and enable local storage for each, as long as they are in the same location.
Locally stored clips are accessible from the app for the last 30 days. For recordings beyond this period, safely remove the USB and connect it to your PC.
Unlike cloud recordings where you can delete multiple clips at once, local storage requires deleting one clip at a time on the app or connecting to a PC for multiple deletions.
The significant advantage of local storage is the ability to run your Blink system without a monthly subscription, saving you money each month.
Setting Up the Local Storage
To set up local storage for your Blink system, grab a Sync module 2 and a USB drive. Once the Sync module is part of your network, stick the USB in and check the app’s connection status.
A properly connected sync module boasts solid blue and green lights, signaling network access and sync with cloud servers. To integrate your USB drive, follow these steps:
- Confirm your Sync module 2 is Wi-Fi connected.
- Slot in a properly formatted USB drive into the module’s port.
- Open the Blink app, select your Sync module, and go to settings.
- Click on “Local Storage” and check the status. “Connected” means the thumb drive is recognized, displaying available storage and attached cameras.
- If the USB is in an unsupported format, a pop-up suggests formatting. You can do this on the app, erasing data and triggering a firmware update if needed. Let the app handle it, or cancel and format the USB on a computer to ExFAT or a compatible format.
Activate motion detection, arm your camera, and in 2-5 minutes post-trigger, find your motion clips on the app.
Blink Sync Module 2
The Blink Sync Module 2 is the key to unlocking local storage capabilities in the Blink Camera System. Connect a USB flash drive to the Sync Module 2, and you can conveniently store recorded clips locally. To view these clips:
- Launch the Blink app on your mobile device.
- Tap the Sync Module banner.
- Select “Local Storage.”
- Press the “Safely Eject” button.
- Hold on until you see the “USB Disconnected” notification.
- Remove the USB drive and connect it to your computer to access the video clips.
Should you face issues with local storage, troubleshoot with these steps:
- Confirm that Sync Module 2 recognizes the USB drive.
- Check the available free space on the USB drive.
- Reboot the router or unplug the sync module for 60 seconds.
- Reconfigure the USB drive.
- Remove and re-add the sync module in the Blink app.
In summary, Blink Local Storage is a valuable feature for non-subscribers, ensuring your recorded clips are securely stored and easily accessible through the Blink Sync Module 2.
Local Storage in Web Development
In web development, local storage plays a pivotal role in enhancing user experiences. Unlike cookies, local storage allows the storage of larger data sets, up to 5 MB per domain, persisting even when users close their browsers. This effective arrangement essentially lessens server load and further develops application execution. Key benefits incorporate industrious information, diminished server reliance, quicker information recovery, and disconnected usefulness.
Use Cases and Applications:
- User Authentication: Storing authentication tokens for persistent user logins.
- Caching: Optimizing performance by locally storing frequently accessed data.
- Form Data Persistence: Safeguarding user input in lengthy forms.
- Customization: Tailoring user experiences through stored preferences.
Best Practices:
- Data Security: Avoid storing sensitive information in local storage.
- Data Management: Implement regular cleaning and expiration policies.
- Fallback Mechanisms: Ensure consistent experiences across various browsers.
Implementing Blink Local Storage
The process of implementing Blink Local Storage is a key aspect of optimizing your home security system. Here, we outline essential steps and considerations to ensure a seamless integration.
- Configuration and Setup: Begin by configuring your Blink system to enable local storage. Access the settings menu, where you’ll find options to set up and customize local storage preferences.
- Storage Capacity Management: Understand the limitations of local storage and manage your system’s storage capacity effectively. Regularly review and delete unnecessary footage to maintain optimal performance.
- Automated Backups: Explore automated backup options to safeguard critical footage. This ensures that even in the event of a local storage failure, essential data remains secure.
- Integration with Other Features: Maximize the potential of Blink Local Storage by integrating it with other features, such as motion detection and scheduled recording. This synergy enhances the overall functionality of your security system.
- Firmware Updates: Stay informed about Blink’s firmware updates, as they may introduce new features or improvements to local storage functionality. Regularly updating your system ensures you benefit from the latest advancements.
Settings and Functionality of the Camera
Explore a variety of customizable options in the Blink app to enhance your camera experience. These settings are designed to optimize motion clips, extend battery life, and manage storage effectively:
- Customizable Motion Zones: Tailor your camera’s field of view by defining specific areas that should prompt motion alerts. This feature allows you to concentrate on crucial zones, reducing unnecessary notifications.
- Motion Alert Interval: Customize the time interval your camera waits before activating another motion alert. This not only helps conserve battery life but also minimizes recordings that aren’t essential.
- Viewing Angle Adjustment: Modify the camera’s viewing angle to capture your preferred coverage area. Opt for a wider view for more motion events or a narrower one to focus on specific regions.
- Thermal Detection: Leverage Blink’s thermal detection technology to initiate precise motion alerts. Properly position your camera and fine-tune sensitivity settings for maximum accuracy in detecting motion events.
- Long-Life Battery: Achieve an extended battery life by finding the right balance among features such as activity zones, retrigger time, and recording settings. Customizing these aspects ensures efficient energy utilization without compromising functionality.
Effective Storage Management
To keep your Blink camera running smoothly, it’s essential to manage local storage efficiently. Consider these tips for optimal storage settings:
- Size Matters: Pick a USB drive size that suits your storage needs. Larger capacities can store more clips, but ensure your Sync Module supports the chosen drive.
- Auto-Delete Settings: Configure your Blink camera to automatically delete the oldest clips when storage is full. This guarantees uninterrupted recording without manual intervention.
- Backup Clips: Back up crucial motion clips regularly to an external location, like a computer or cloud storage. Monitor storage usage in the Blink app to avoid data loss.
- Battery Basics: Use recommended batteries, like lithium or high-quality alkaline, for optimal camera performance and longer battery life. Regular battery checks help maintain camera functionality.
Frequently Asked Questions:
Q: How do I save a video to local storage on Blink?
A: Saving a video to local storage on Blink is a straightforward process. In the Blink app, navigate to the video clip you want to save. Click on the desired clip, and you’ll find an option to download or save it locally. This ensures that the footage is stored on your device for future reference.
Q: What is the maximum capacity of Blink local storage?
A: Blink Local Storage has a capacity of up to 64GB per sync module. This ample storage space allows users to retain a significant amount of footage locally. It’s essential to monitor the storage levels regularly, deleting unnecessary clips to maintain optimal performance.
Q: How do I record on Blink without a subscription?
A: Blink offers users the flexibility to record without a subscription. By default, Blink devices capture motion-triggered clips, which are stored locally. Users can access these recordings through the Blink app without the need for a subscription plan. However, for extended cloud storage and additional features, a subscription may be considered based on individual needs.


